Showing posts with label painting. Show all posts

Friday, 12 January 2018

Spice Wall DIY Project


While I was a cooking a bit more dishes on holidays I came up with a problem you might recognize. Small bags of spices are difficult to use when you have to go through the pile to find the right spice. When cooking you should find right spices as quickly as possible so that following a recipe and preparing food stays relaxing, fun and inspiring. Also when I went grocery shopping I didn't remember what spices I have got at home because managing this pile was challenging. I found myself in a situation where I had 3 bags of cinnamon, four bags of cardamon and I had run out of turmeric that I needed for a dish I was preparing. So frustrating! Sure it would be possible to buy bigger amounts of spices in glass bottles and have those in a shelf. I have found small bags handy as spices keep fresh. Spices that I don't use that often get ruined in big amounts. 

What if you had all these small bags organized on a wall? It would be super easy to find a spice you need in your recipe. It would also be a handy way to follow what spices are running out. You could easily take a picture from the wall and see what spices you got when you are shopping. If you are browsing blogs on your way to work and find a great recipe you want to try that evening you don't have to memorize if you got turmeric or ginger or cayenne. Just check a current picture of the spice wall. Did I get you excited about this DIY? 

As a little extra tip on how to use spice wall differently I have two ideas. How about recipe wall? You could plan menu for two weeks to this wall. Write down the week days with chalkboard pen, write / cut recipes from magazines/ blogs and hang under the days. I know some of you are keen gardeners so how about keeping seeds organized on this wall! You could keep track on what seeds need to be planted first and then keep calendar when you put the seeds to the soil. I am sure you come up with many more ways to use this organizing wall because this framed wall can be hanged in what ever space you need it. Now I show you how to make this easy DIY!


Spice Wall

You will need:

Big frame
Strong cardboard or thin plywood same size as the frame
Chalkboard paint
Wooden clothespins
Woodwork glue
Chalkboard pen
Ruler
Brush


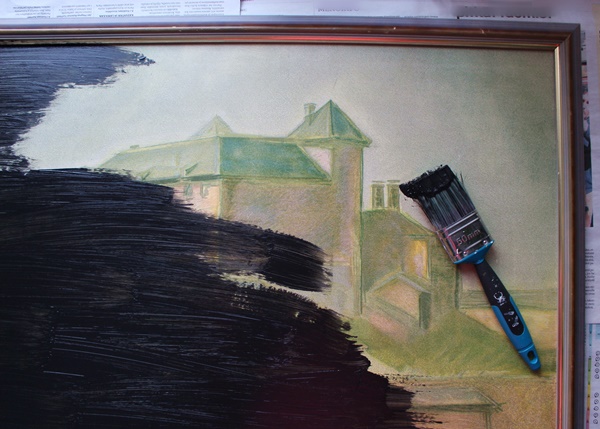
Step 1. Paint the frame and cardboard/ plywood with chalkboard paint. Paint tree layers: horizontally, vertically, horizontally. I bought this framed print from thrift store. The print was glued to the cardboard but the cardboard was perfect to this project so I painted over which worked fine and I had no need to buy extra cardboard or plywood to this project.


Step 2. After the paint has dried properly (24 hours) divide the board to equal parts using chalkboard pen. Measure how much space one spice bag and clothespin needs and decide how much you need around to write spice's name. See how many bags you can fit to the board. I have got 58 cm * 77 cm board and I divided it to 16 parts (approx 14,5 cm *19 cm each). Then measure the place where you attach the clothespin. 


Step 3. Glue the clothespins and let dry.  Remove chalkboard pen's marks. Hang the spice wall and put in the spices. Write the names of the spices and decorate the board with chalkboard pen.


I am proud to start the weekend with organized kitchen. It is inspirational to cook in this space where everything can be found. Especially in a small space like this keeping organized is challenging. You don't need to have much extra lying on desks to have a mess. At least this solution keeps the spices organized and easy to use.

Happy and Relaxing Weekend!

Sannu

Monday, 18 December 2017

18.12. Painted Star Napkins


These napkins were inspired by a star model I made for the mug coaster the day before. Inspiration can be found everywhere when you look closely forms and materials. You can use napkins in a table setting creatively for example as small tablecloths or breadbasket clothes. 


You will need:

Grey linen
Sewing yarn
White fabricpaint
Cardboard paper
Small brush
Pencil
Ruler
Angleruler
Compass
Scissors
Iron

How to:

Step 1. Cut 35 cm * 35 cm pieces from linen, fold the seams and sew.

Step 2. Draw a star model. Draw 6,5 cm and 2,5 cm circles, smaller inside the bigger one. Divide the circles to 16 sectors that have a 20 degree angle. Connect the points moving from inner circle to outer circle and back. Cut out the model.

Step 3. Draw the star to the linen. Draw the inner circle to the star with the compass, draw also the lines between points.

Step 4. Use small brush to paint the star according to lines. Let dry. Iron the paint to the fabric (usually advised to iron through baking sheet).


Monday, 4 December 2017

4.12. BuJo Ideas for December


Today I share ideas to December's BuJo. Christmas themes are all around on these colorful pages. You can play with watercolors, markers and stickers when  planning this fun month. 


On my monthly spread I used watercolors first time in my BuJo history. First I draw the Christmas baubles, calendar and words from my favorite Christmas song. Then I colored the page with watercolors.


Christmassy activity tracker. Because it is December you can come up with a bit different activity goals than you would normally have. Chocolate eating goals anyone? 


To get all fun Christmas activities done you could also draw 24 baubles and one activity for each day. I like to book simple activities like listen to Christmas carols, long walk and gift wrapping because those are the actual things that make the Christmas feeling. 24 days before Christmas goes quickly with small treats everyday. There is no need to over achieve these tasks. If I don't have time to watch Christmas movies I can skip it. These are not work tasks but relaxing moments sprinkled to  everyday-life.

Friday, 22 September 2017

Mid-Century Modern Table DIY


Friyay! While being effective for the last working hours of the week it is time to get inspired and search for the best DIYs of the weekend. Side tables are handy in home decor. They offer extra surface for seasonal arrangements, place to leave your books and coffee mugs or to keep all the little plant pots organized. Today I went for darker colors to get a side table that will give needed contrast to all my bohemian style collections. I love layered look that has elements from different eras and styles: old worn out carved wood, modern design chairs, bright colors, global style patterns and eclectic mid-century. 

Combination of mid-century modern and bohemian style works quite well I think. Especially when color palette in furniture is simple and combined with deeper bohemian shades. Harvest season's colors like pumpkin orange, beetroot purple and moss green begin to look great with warm wood and grey. Golden accents make the look luxurious and urban. I have had many styles during the years and the modern twist is the latest one. Clean lines calm down the overall look which is great in small space like my apartment. Grey walls, mirrors (check this contemporary mirror wall DIY!) and two big carpets create a sense of a bigger space and allow to play with smaller and more decorative objects. 

Idea of this table came with the need of an extra small table and the legs that appeared from the garbage about the same time. I could not find suitable plank from the garbage or thrift store so I had to buy a new one (cost 10€). I modified the plank to fit in a narrow space, that is why I sawed of the corners. Paints are all more of less leftovers. I always tend to have some jars in my closets. As a starting point with the colors I had a thought that I am not going to add any more colors in the house so I kept the palette simple. Now I have plans to put my stereos on this side table and maybe a small flowerpot.


You will need:

Metal table legs + screws
Wooden plank
Paint in three colors (I used golden spray paint, black furniture paint and brown antiquing wax)
Painter's tape
Sanding paper
Strong white paper like wallpaper
Saw
Pencil
Ruler
Scissors
Drilling machine and drill

In today's tutorial I have got more pictures than usual but I hope that in case you are making this DIY you will find them helpful. This DIY is not difficult to make yet includes many different steps. So here is how I made this table:


Step 1. The table legs are a garbage find. I spray painted the legs with golden spray paint. Then I bought a plank that fits to the legs. This plank is 40 cm * 1 m. 


Step 2. To get right proportions to make legs and table cover work together I removed few centimeters from the length. Because this side table is going to a narrow place I removed the corners. I always hit myself to sharp corners so I hope to prevent that with this simple design.


Step 3. Saw off from the length if needed. Saw off the corners. Sand the edges.


Step 4. Attach the legs. First I measured how wide the the leg pair is and counted it to the middle. Then I draw another line from the front edge. As a result I got a rectangle that works as guide to get the legs in their right place.


Step 5. Screw the legs to the plank. If needed attach supporting pieces to keep the plank firm in use.


This table would look pretty like this or painted with just one color but we are not stopping here!


Step 6. Cut a model that is the exact same shape as the table cover. Use a long ruler to draw lines and form random geometrical shapes. My tip would be to keep most of the shapes quite big and then add few smaller shapes. This keeps the project easier to paint plus creates dynamic look.


Step 7. Decide what paint are you going to use in particular blocks. In case you are using spray paint cut out the blocks you are spray painting.


Step 8. Use painter's tape to secure the lines. I left about 0,7 cm gap between color blocks which means that I put the tape 0,3 cm over the models line. 


Step 9. Spray paint the blocks. If you want to use spray paint in all blocks you need to make as many paper models as you got colors. Then you just cut out the blocks you are painting with the certain color.


Step 10. Gently rip off the tapes when the paint is dry. Try not to break the model.


Step 11. Then cut off blocks one by one drawing the outlines to the table cover.


Step 12. Use ruler to get the lines sharp and gaps between the blocks right.


Step 13. Then it is time to paint with the second color. With furniture paint I worked block by block. I put the tapes, painted and removed the tape immediately before the paint was dry. This because acrylic paint sometimes cracks with the tape when dry.


Step 14. After the furniture paint blocks were dry I did the same with rest of the blocks. This time I used antiquing wax.


Step 15. Then I painted the edge with the black furniture paint.  After the paint was dry I sanded the gaps between blocks to take off the pencil marks and paint that went over the lines. 


Best thing in this mid-century inspired table is that it is timeless piece in home decor. It can be styled with various ways. You could decorate the whole home with mid-century pieces and this table would not pop out. Also it is a perfect dynamic piece in modern global style. I love to collect all sorts of decorative items, like trays, flower pots, baskets, decorative pillows etc. The look might get a little messy without furniture like this that gives frame to the entity.

Hope today's post and this tutorial was both inspiring and helpful. Please share my tutorials and projects on social media if you like them! Shares, likes and follows are the biggest encouragement for my work <3 

Have a Fun and Creative Weekend!

Sannu

Friday, 15 September 2017

Friyay! DIY Day: Punk Inspired


Happy Friday Everyone! What a wonderful thing that weekend is waiting for us. Two long days for relaxing and making DIY projects. Part of Friyay! fun is to gather inspiration from blogs and SoMe. Then do last minute shopping and get back home to craft and cook. 

Today's project has got it's inspiration from punk.  Vibrant colors combined to shiny golden surface makes an interesting contrast. Splattered colors declare free style attitude towards formal pattern. Still when combined to plain colors and humble green plants these pots give nice design edge to home decor. Materials are simple so is the technique, lets get making!


You will need:

-Flowerpot that has clean lines
-Golden spray paint
-Acrylic lacquer in 3-4 colors
-Toothbrush and knife


I had these old worn out flowerpots that needed some new color. I had planned to paint abstract pattern but then came to other thoughts.


Step 1. Cover the surfaces. Clean the pot. Spray paint the pot with golden spray paint. Do two layers of paint if needed. Let dry properly.


Step 2. Test the technique and colors you want to use. I had three different greens and pink. Using knife spread a bit of color to the toothbrush. Then splatter the paint from the brush using the same knife. 


Step 3. Pots ready to be painted. Quickest way is to paint two sides at a time. First one side and then turn the other side (because the paint is wet you can't paint all four sides at a time!).


Step 4. Always remember to use clean tools when starting with new color. I began the painting process with pink, did two sides, washed the tools and then took next color. After all four colors I let the pots dry properly. Then I did the same for the other two sides.


When pots were dry I got to move plants in. I had monstera and lucky bamboo waiting for proper home.

With colorful splatters these golden pots are not too shiny. Good looking pots lift up the basic green plants. These pots would also be stunning in all white home decor adding artsy atmosphere. Clean lined cube shape controls the otherwise psychedelic feeling these pots create.


My weekend continues with a walk to the hardware stores. I have plans to buy wooden plank for a small table project. I have already spray painted the legs that are a garbage find. I have also made some sewing plans but I have run out of pink cotton fabric. How does it happen that pink always seems to vanish from my cabinets? Happens to pencils, paints and other pink materials. Do you have a color that you use a lot? Pink is, in my opinion, great accent color and easy way to modernize a furniture or quilting pattern.

What are your plans for the weekend's DIY? Are you going to make smaller projects or start something bigger?

Have a Creative Weekend!

Sannu