Showing posts with label wall art. Show all posts

Wednesday, 21 March 2018

Wall Plate Installation


Permanent markers. A pile of old plates that are originally from a thrift store. And few pictures from inspiring views. 

When I make my long walks I tend to stop and take pictures if something interesting catches my eye. Some weeks ago it was bright sunny day and I saw tracks on ice. Tracks looked like a graphic print to my eye. Back then I was making a quilting project and all that I saw connected to quilting. You know, I have quilting weeks (or months) when I quilt a lot and then I have a break and do other projects. So when I looked at the surface of the ice I thought it might work as a stitching pattern. I let this thought rest and went to plan next projects. 

Then two weeks ago I came across two white wall plates that I had in my cabinet. I had all sorts of ideas to decorate the plates but then I remembered the pictures I had taken of the tracks. I actually first thought about making these plates black and white. But why if there are all these spring colors to use. Free hand I began to draw the tracks that snowmobiles, skiers and people by foot had made to the ice. Then I colored the drawing. Working with permanent markers was a good school about accepting mistakes. It was not that easy to go and correct and I just had to let go and draw. When I followed the circling paths people had made I came to think about how it is said in Boris Pasternak's Doctor Zhivago that "Life is no stroll through the field" (I like this saying and I wrote about it before when I talked about Cheryl Strayed's Wild). Actually these colored patterns on ice look like pictures taken from fields. I still think I might draw black and white version on paper using very thin marker. It would look like graphic print. It would be also easier to work on paper compared to slippery plates and permanent markers. When you scroll down you can see the two pictures I used when drawing the plates.


Friday, 19 January 2018

Bohemian Style Curtain Makeover...

... and How To Develop Upcycling Skills


Curtains are a home decor element that bring warmth, softness and character to a room. Because I live in a top floor I am quite minimalist with curtains. I have no need to cover whole windows with shades. I use curtains to finish the overall style and to get more color. A curtain in my living room has pink flowers on grey base and it completes the theme of my living room space that is lead by grey walls & big grey carpets and pink cabinet & small pink details. I love bohemian style and in my opinion it is essential to have some color theme so that super colorful details and interesting objects stand out. Otherwise the result is a chaos and beautiful textiles, baskets, bowls and ornaments will be just part of the mass.

Today's curtain makeover is both minimalist and bohemian. Black and white combination allows to layer with flowers, plants, beautiful plates, books, chandeliers and textiles. Yet the curtain is interesting with it's tassel details and real eye catcher. You could also use this side curtain as a wall textile or make two curtains to both sides of the window.

Inspiration to this curtain came from the material and texture. I found natural white 80s curtain from a thrift store. I liked the look even though it was slightly too neutral to my taste. I noticed the curtain has a lots of potential to become amazing bohemian style home decor element. It gives through light and is perfect for spring. I had a ball of black mercerized cotton yarn at home and that was all I needed to update my thrift store find to fit 2018.

I think these kind of earthy, natural white and textured curtains are relatively easy to find. You might not find a curtain that is exactly the same, but eye options with care. You could also use simple and loosely woven white fabric to this project. If you want the curtain to be a colorful element in your home decor, you can choose to use different colors of cotton yarn.

Trends come and go but the best part is that thrift stores have items from the era the same trends were in fashion last time. Usually the latest interpretations to the trend have brought a new twist to the style and you have to modify your second hand finds a bit. It is ecological, fun and inspiring to use recycled materials. Not to mention how much money you can save. Study a trend properly and think through what is this trend about. Is it about natural hues, certain color combination, texture, pattern or ornaments that construct the style. This way you see the potential in items that need a little bit of remodeling. Maybe berry hues and interesting textures are in fashion and you find a perfectly textured fabric you can dye. Or maybe you just need to remove paint from a furniture that has perfect shape.

Bohemian Style Curtain Makeover

You will need:

Natural white curtain that has texture
Black mercerized cotton yarn
Piece of cardboard
Ruler
Scissors
Needle


Step 1. Fit the curtain to a window. You might need to cut and sew it shorter.


Step 2. Cut 6 cm * 8 cm piece from cardboard. Cut a piece of yarn and place it horizontally. Then round 26 layers of yarn around 6 cm. Knot the piece of yarn tightly and remove the bundle from cardboard. Take a second piece of yarn and wrap tightly around the bundle, from about 1 cm from the knot. Take a needle and thread the yarn ends through the bind. Open the tassel by cutting the loops and trim the tassel even. I made 77 tassels like this to my curtain and it took few evenings.


Step 3. Attach the tassels to even rows using the first knot's yarn ends. If you have a notable pattern in your curtain use it as a starting point to plan the rows. In my curtain I have wide and thin stripes and I attached 7 tassels to every thin stripe.


Do you use recycled or thrift store materials in you projects? Do you follow home decor trends? How do you apply trends to your home, do you prefer upcycled home decor and furniture or all new?

Have the most Inspiring and Relaxing Weekend My Friend! By the way, the lamp you see in the pictures is also a thrift store find, you can find Ikat Inspired Lamp Makeover with Paint from HERE!

Sannu 

Friday, 12 January 2018

Spice Wall DIY Project


While I was a cooking a bit more dishes on holidays I came up with a problem you might recognize. Small bags of spices are difficult to use when you have to go through the pile to find the right spice. When cooking you should find right spices as quickly as possible so that following a recipe and preparing food stays relaxing, fun and inspiring. Also when I went grocery shopping I didn't remember what spices I have got at home because managing this pile was challenging. I found myself in a situation where I had 3 bags of cinnamon, four bags of cardamon and I had run out of turmeric that I needed for a dish I was preparing. So frustrating! Sure it would be possible to buy bigger amounts of spices in glass bottles and have those in a shelf. I have found small bags handy as spices keep fresh. Spices that I don't use that often get ruined in big amounts. 

What if you had all these small bags organized on a wall? It would be super easy to find a spice you need in your recipe. It would also be a handy way to follow what spices are running out. You could easily take a picture from the wall and see what spices you got when you are shopping. If you are browsing blogs on your way to work and find a great recipe you want to try that evening you don't have to memorize if you got turmeric or ginger or cayenne. Just check a current picture of the spice wall. Did I get you excited about this DIY? 

As a little extra tip on how to use spice wall differently I have two ideas. How about recipe wall? You could plan menu for two weeks to this wall. Write down the week days with chalkboard pen, write / cut recipes from magazines/ blogs and hang under the days. I know some of you are keen gardeners so how about keeping seeds organized on this wall! You could keep track on what seeds need to be planted first and then keep calendar when you put the seeds to the soil. I am sure you come up with many more ways to use this organizing wall because this framed wall can be hanged in what ever space you need it. Now I show you how to make this easy DIY!


Spice Wall

You will need:

Big frame
Strong cardboard or thin plywood same size as the frame
Chalkboard paint
Wooden clothespins
Woodwork glue
Chalkboard pen
Ruler
Brush


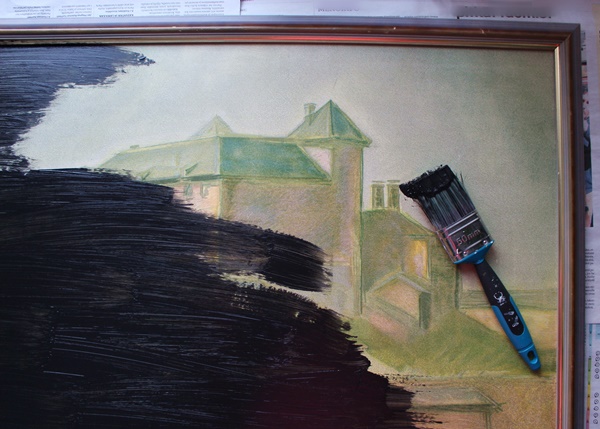
Step 1. Paint the frame and cardboard/ plywood with chalkboard paint. Paint tree layers: horizontally, vertically, horizontally. I bought this framed print from thrift store. The print was glued to the cardboard but the cardboard was perfect to this project so I painted over which worked fine and I had no need to buy extra cardboard or plywood to this project.


Step 2. After the paint has dried properly (24 hours) divide the board to equal parts using chalkboard pen. Measure how much space one spice bag and clothespin needs and decide how much you need around to write spice's name. See how many bags you can fit to the board. I have got 58 cm * 77 cm board and I divided it to 16 parts (approx 14,5 cm *19 cm each). Then measure the place where you attach the clothespin. 


Step 3. Glue the clothespins and let dry.  Remove chalkboard pen's marks. Hang the spice wall and put in the spices. Write the names of the spices and decorate the board with chalkboard pen.


I am proud to start the weekend with organized kitchen. It is inspirational to cook in this space where everything can be found. Especially in a small space like this keeping organized is challenging. You don't need to have much extra lying on desks to have a mess. At least this solution keeps the spices organized and easy to use.

Happy and Relaxing Weekend!

Sannu

Tuesday, 5 December 2017

5.12. Framed Wreath


Happy fifth day of December! Wreath is a classic Christmas decoration and today I show you how to make a bit different wreath decoration for this Christmas. This nostalgic wall art is made of using materials from thrift store. It has something that makes one think about historical period drama, magical childhood Christmases and old storybooks. 


You will need:

Old frame
Strong cardboard paper (might come with the frame)
Small plastic wreath
Black calligraphy marker
Piece of wire
Ruler
Knife/Scissors

How to:

Step 1. Measure the frame and cut 2 pieces of strong cardboard paper to match the frame.

Step 2. Cut one cardboard piece to a passepartout. Write Merry Christmas or Happy Holidays to the down middle of the passepartout. Put the passepartout and whole cardboard piece to the frames.

Step 3. Plan how you want to place the wreath to the cardboard background. Use wire to attach the wreath to the cardboard. Easiest way is to make two small holes to the cardboard and then tie the wreath to the cardboard and twine the wire ends to the backside. 

Now you have a beautiful Christmas wall art to put on your door or for example give as a nice gift to your friend!


Sunday, 29 October 2017

Wreath from Natural Materials


Wintertime began today and it was wonderful to get to sleep one hour more and still wake up quite early. Yesterday it started snowing properly. Frosty scenery is now turned into black and white. Before Christmas decor and preparations I decided to make one last minute Halloween / All Saint's Day DIY. It felt like I have all the time in the world before Halloween. Then last week I saw some countdowns to Halloween and found out that it is actually on next week's Tuesday. We Finns have traditionally celebrated All Saint's Day and Halloween is relatively new phenomenon. On All Saint's Day people light candles on the cemetery and prepare a more festive dinner. Now Halloween decor is becoming more common. Even though Halloween feels a bit over commercial with all it's accessorize I think it is nice way to brighten up long fall and winter season. I used to start decorating Christmas on September but now I feel no need to be so early because there is this Halloween and pumpkin season. Last week I tried my first ever pumpkin spice latte. Spotted it at the local cafeteria. New phenomenons come into our lives little by little. After this Halloween and All Saint's Day week it will be nice to think about Christmas decorations. I have noticed that November always goes so quickly and then on December it will be Christmas all month. 

I gathered the materials for this wreath on Friday before the thick layer of snow came. After the autumn storms it was easy to find branches from the ground. Best part in this wreath is that you can easily update it for winter season by removing the leaves and adding some baubles or fake snow.


Wreath from Nature

You will need:

Branches
Pine cones
Wire (brown/copper)
Hot glue gun + glue
Paper yarn
Golden sewing yarn
Scissors
Needle

1. Take half of the branches and stretch them into a loop. Tie the loop with wire. Attach some more branches to the loop loosely with wire.
2. Let the pine cones open in warm room over night. Then attach the pine cones to the loop by hot glue gun. 
3. Twine open some colorful paper yarn and cut it to small leaves. Sew the leaves to a golden sewing yarn by hand. Decorate the wreath with the leaves. If you want to create a winter look you could use white paper yarn to the leaves.
4. Make a hook from wire and attach to the wreath. Hang the wreath to a door, window or wall. 


Lets enjoy the last days of October and autumn before November and first winter season DIY projects!

Sannu

Monday, 21 August 2017

How to: Contemporary Mirror Wall


Getting a new week started! This morning I felt like Phil in the movie Groundhog Day (1993). You know how he wakes up and it is always the same Groundhog day, same people come across, same activities. It was just yesterday when I woke up and it was Monday and now again. Some people love routine and predictable days with repeating schedules. I have to admit that I am not one of those people who love the so called everyday life. I do like to do plans but I just prefer that I have different plans for different days. I don´t mean by this that I would want life to be constant party and celebrations. More that I could work with variable tasks, take a walk to different direction than yesterday, hobbies that offer new challenges etc. Sure this is something that I can effect myself 99%. Still some days are Groundhog Days because you have to get up every morning, brush your teeth, eat your porridge and drink a cup of coffee not to mention other possible morning, midday, afternoon, evening tasks that keep you alive. Maybe I should buy a toothbrush for every day in different color and use Wednesday brush on Sunday. Excitement!


When I was still studying I worked in a same place for three summers. It was great place to work, work colleagues were fair and practice was clear. Absolutely nothing to complain. What I felt challenging were the routines. Days were quite alike because work included repeating tasks. On third summer I could not tell which summer some things had happened and I sort of lost years in my counting when I tried to remember. If I think my high school years (I might be getting old because I start recalling past things :) I come up with an image of early morning in a bus reading my homework. All three years were the same early mornings in a bus. Going to University was my thing, no routine, no repeating schedule, new ideas every day. Now I am having these Autumn thoughts two years after the graduation. Maybe it is because of the beginning of a new school year for some that makes me think about these. Last week I got it settled that I will go to some lectures and I am super enthusiastic about that. I have big hopes for this new season. I made a plan for this week to be more productive and organized (hope it shows on my blog). Weekly plans and writing BuJo makes it easier to do things consciously and remember what you have been up to some weeks, months and years ago. It also breaks the path of repetition as seeing the past helps to make plans for the future.

Last week I got a three part blog post series done and I hope this week will be equally as inspired and active. I have got ideas listed for the week's posts. New season shows in my home decor as I have wanted some change to mark the Autumn started. Some weeks ago I went and painted the big wall of my apartment. I have had the same wallpaper for almost two years and I was not 100% happy with it. After painting the opposite wall dark grey the white flower wallpaper started looking old. I had planned to put my 2017 quilt on the wallpaper wall but it did not fit, so I painted the wall so it would match better. The new light grey paint was so beautiful that I did not want to cover it with the large bright quilt. Finally the quilt found it's place on the other wall and the newly painted wall was left empty. I remembered a pile of old eighties mirrors in my storage. Mirrors could be a luxurious and light wall element for a small apartment as mine is. Going all eighties and putting the mirrors to a grid was not my thing. I wanted the mirror wall look more like wall art and contemporary. I made some drawings and thought that harlequin pattern made with mirrors and empty gaps might be simple yet stylish solution.

For this project you will need:

A wall
9 Square shaped mirrors
Strong tape that is made for attaching mirrors
Strong cotton yarn
Masking tape
Small weight (like scissors or stone..)
Scissors
Pen
Tape measure


Step 1. Measure the mirrors you are using so that you know how big space you need to arrange on your wall.  Clean the wall and the mirrors. Take a piece of yarn that is well over the height of the three mirrors going on row. Attach the weight to the end of the yarn and use masking tape to hang the yarn to the wall as seen in the picture. This yarn will show you the middle row of mirrors and you have to attach the mirrors so that the two corners go to the line (=you get the mirrors straight).


Step 2. Take the first mirror and put strong tape to four sides like in the picture. Attach the mirror according to the yarn line seeing that the two corners go to the line. Also remember to consider the height so that there is space from the ceiling plus other two mirrors have space under the first one.


Step 3. Attach the rest of the mirrors of the row. Pull off the yarn from under the mirrors.


Step 4. Use one mirror as a measure to get the place for the next row. Put it to the space that is going to be a gap and make a mark to the outer corner. Do the same to other gap. Now you have two marks and you use these marks to set the line with the yarn. Hang it again so that it goes through the marks.


Step 5. Attach the first mirror of the second row so that two of the corners go to the yarn line and third one to the corner of the middle row's first mirror. Attach the rest of the mirrors similar way.

Step 6. Now it is time to go to the other side of the middle row and repeat steps 4. and 5. Polish the mirrors.


Now you have harlequin inspired pattern made with 9 mirrors. In case you have bigger wall you could use more mirrors. It is easy to attach the mirrors with the help of the yarn line. 

Hope this tutorial was helpful. This is one example how different old things can look when you decide to arrange them differently instead of the ordinary way. It feels like the mirror wall has doubled the space and the Egypt posters I have on the opposite wall reflect to the mirrors. It is like Narnia when you look your home through the mirrors not to mention the dancing hall effect when it is evening and no one is looking ;D

You might also like these posts: Furniture makeover ideas and new style for living room and Garbage Treasures: Trendy Magazine Stand.

Have a great start for the week!

Sannu

Thursday, 3 August 2017

Welcome to the Quilter's Residence!


I have finally completed the quilting project that I started in Easter holidays! It has not been a full time job for me so that is why it took so long. I have made smaller DIY projects and furniture makeovers every now and then (plus of course a lot more that is not related with crafts or DIY). During the July heat I made very little progress until the end of the month when I decided it was time to get this done before it is covered in dust. I had fun making this quilt and it has been a combination of two techniques that were new to me and I wanted to give a try. It had enough challenge although making 54 similar blocks begun to feel like routine sewing. Friendship braid was great way to use all leftovers and super easy to make. It is like making one corner of a log cabin. I had to be creative with corners as even the leftovers begun run off and I used small squares instead to make moving birds. After all solving problems and finding out new solutions is what makes every quilt so special. If I would have made this 100% according to the plan it might not be as beautiful and interesting as this is.


I made a wild decision when hanging the quilt. I put it to my sleeping space where I already have the last years quilt as a blanket. It surely will divide opinions but I think it looks great. Overall impression is artistic and super colorful. Warm quilts also create wanted coziness which is not bad for sleeping corner. My intention with this years quilt was to collect the essence of summer to one work so that it would warm also mentally when winter storms arrive (not soon I hope!). I named last year's quilt Southern Ocean (click to see more). This year's work is Spirit of 2017. I love to combine traditional patterns and ultra modern colors and fabric. I think this year's work has a hint of pop cultural hues and modern art inspiration bound with folklore patterns and symbolic like moving birds in the corners.


As I already told on Instagram the final part of making a quilt this big is always the most challenging. It is like a workout to manage huge work than weights a ton. Because I made patterns so petite it means that the seams took as much fabric as the right side. With patting and back  fabric it was a good weight lifting exercise to stitch. Now that the work is on the wall I begin to forget the difficulties and plan next project. My back still hurts from this one so it might be that I make something smaller like decorative pillows (that corner might need some quilted pillows don't you think :P) and return with my blanket projects next year, laugh. 

Have you been quilting or sewing lately? Or making other DIY projects? It would be nice to hear about You! I love to connect with DIYers, makers and people who love to read about these subjects!

Have a wonderful Thursday and Weekend my friend!

Sannu